Behaviour Tree
Introduction
Here is an introductory video regarding how Behaviour Trees work, and some details on our own implementation:
From Start to 1:15: Introduction;
From 1:15 to 21:40: Behaviour Tree basic concepts;
From 21:40 to End: Exploring the sample Decorator/Leaf/Service nodes' codes.
Creating a new Behaviour Tree
On the editor's top bar, click on the (+) button, then select the option Behaviour Tree.


Note: The name that you choose now will be the name of another data asset generated further when you compile what you have done on the visual editor.
That will be the data asset used to actually drive your Bots from the Quantum simulation, so you can already choose a suggestive name.
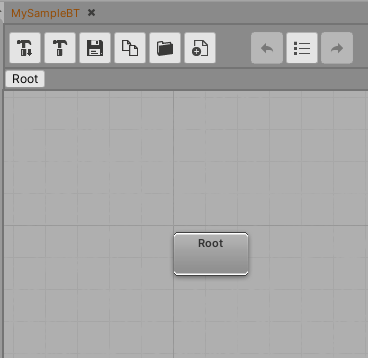
When you save the file, the main Bot SDK window will be populated with a single node, which is The Root Node, for you to begin your work.
The Root Node
As the name suggests, this is the starting point of the tree. It is the main asset that shall be referenced on the BT Agent component and defines what is the first Composite or Leaf node which shall be executed.
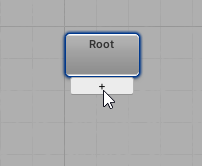
Root nodes can only have one child. To link the Root node to any other node, put the mouse cursor on the bottom part of the Root node and click the "+" button that appears. This will begin the linkage process.
If you have no other node created yet, you can click in any empty space and a node creation panel will show up.
Nodes Status
Almost every Node on the Behaviour Tree have its own State. This is very important because that's how the flow of the Behaviour Tree is mostly defined.
Status can be:
- Success: when the Node successfully completes the task that it was meant to. When the Node returns Success, the control goes upper on the tree to the parent node, which now knows that the children succeeded and can define the flow based on that information;
- Failure: when the Node failed to execute its task. When it happens, control goes upper on the tree just lake when the result is Success;
- Running: if, on that specific frame, the Node neither failed nor succeeded on executing its task, then the node needs more frames running before retuning the execution to its parent node. There can be only one Running node at a time, because the Running node is cached on the BT Agent and is repeatedly executed on the consecutive frames until the result changes.
- Inactive: meant to be used only internally, so you don't have to worry about this one
When coding your own game specific Nodes, you will be deciding when you want them to succeed, to fail or to be running. This will directly affect what branches of the Behaviour Tree will be taken.
We will speak more about the types of nodes and how you create new ones further.
Creating new nodes
There are two main ways of creating new nodes:
- From the context menu when you click with the Right Mouse Button on any empty space on the Editor window
- By initializing a new link from a node, and then clicking on any empty space
Now, lets take a look at what types of nodes can be created.
Composite Nodes
Those are the main source of flow control on the Behaviour Tree. They define what are the possible next nodes to be executed and they behave in different ways.
Composite Nodes try to execute their children nodes from left to right, which means that this is how priority is defined.
A Composite node can be linked 0 to many children nodes, which can be Composite or Leaf nodes.
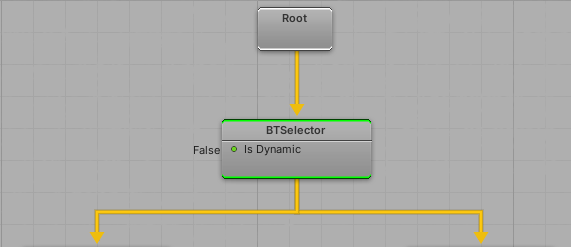
Selector Nodes
Equivalent to an OR operator.
- It succeeds as soon as any of its children succeeds. At that moment, their execution is stopped and the control goes to the Selector's parent node, with the result "Success". If there were any children left to be executed, they will not be executed at this iteration;
- It fails only if all of its children fail, in which case the Selector returns the result "Failure" to its parent node.
Sequence Nodes
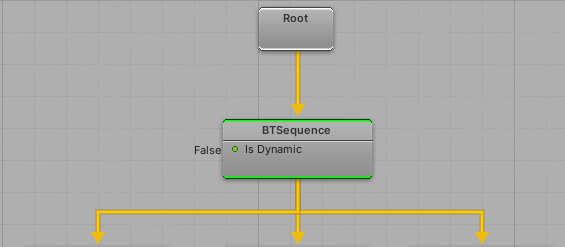
Equivalent to an AND operator.
- It fails as soon as any of its children fail. Returns the result "Failure" to its parent node and the children remaining are not executed this time;
- It succeeds only if all of its children succeed, in which case the Sequence returns the result "Success" to its parent node.
Interrupting with Decorators
As explained on the Nodes Status topic, if a Lead node's Status is RUNNING, this means that the specific Leaf node will be cached and will be re-executed on the next frames. But this also means that we also need some ways of interrupting the execution of that Leaf node based on some conditions. For example, if your FPS character is shooting a target and, suddenly, it recognizes a grenade been thrown in her/his direction, then the character shall stop shooting and take cover to avoid the grenade.
The Decorators that were already checked, will not be re-checked every frame. But as explained in the example above, we might want some special occasions in which the Decorators shall be re-executed for us to be able to interrupt a Leaf.
Interruption checks can be done in two ways:
Dynamic Composite Nodes
As you may have noticed, every Composite node has a IsDynamic field, which is a Boolean that you can toggle during edit time:
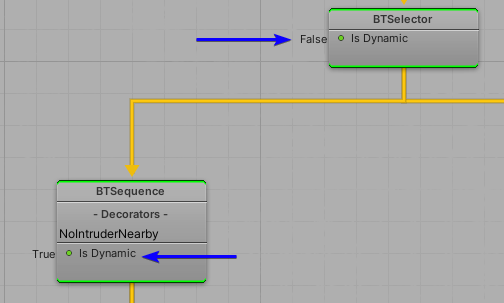
If a Composite node is Dynamic, this means that, while that specific Composite is part of the current subtree being executed, all of its Decorators will be re-checked every frame. If the any of the Decorators fail, then the current Leaf node will be interrupted and that Composite node will result in Failure.
The advantage of this is that you can choose which Composite nodes needs to be re-evaluated every tick, so you have better control over how you can optimize your own tree.
Reactive Decorators
If you have Decorator Nodes which relies on the Blackboard, you can make those Decorators to watch changes on specific Blackboard entries.
The advantage here is, again, not performing decorator checks every tick but, instead, only check if you have set anything possibly new on the Blackboard entry.
For example: you have a "CompareIntegersDecorator", which checks if an integer "A" from the Blackboard is greater than an integer "B" from the Blackboard. With reactive Decorators, the check will only be applied if, in any part of your code, you changed either entry "A" or "B" on the Blackboard.
When the interruption happens, you can choose how you want to Abort the current execution, which can be of three types:
- Self: stop the execution of the current node and abort everything until it reaches the abortion node;
- Lower Priority: keeps executing the current node, but aborts the sibling nodes;
- Both: applies both logics
It is possible to define the Abort Type on the Decorator node itself:
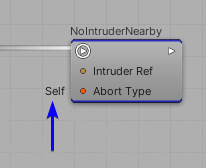
Reactive Decorators is something that is setup on the simulation code, so please take a look on the BT coding session for more details.
Leaf Nodes
These are the lowest level nodes on the Behaviour Tree.
They are responsible for performing most of the game specific logic, highly relying on the Status that shall be returned when they are run.
Simple examples of Leaf Nodes are:
- Wait Node: keeps RUNNING until a certain amount of time passes. Returns SUCCESS when the timer is finished;
- Chase Node: while RUNNING, keeps moving the BT Agent towards a target Entity. Returns SUCCESS if it the Agent manages to reach its target. Returns FAILURE if the Agent is somehow blocked from reaching that target (like, if the target was destroyed, or in in a separate nav mesh region);
- Debug Node: prints a message on the console and always returns SUCCESS;
So the Status that you will need to return completely depends on your needs.

Decorator Nodes
Decorators are the conditional nodes. They are meant to help with the definition of what branches should be executed.
Besides of being able to return a Status, this type of node also returns a Boolean, which then leads to Success if the Boolean result is True, and leads to Failure if the Boolean result is False.
Decorator Nodes can block or allow the execution of the subtree which it is attached to. They are added inside Composite and Leaf nodes, so you can selectively express which nodes needs to take some conditions into consideration before being executed.
Examples of Decorator Nodes are:
Has Ammunition Node: returns TRUE if the BT Agent has more than zero bullets on its weapon;
Has Target Node: returns TRUE if the BT Agent has a Target defined on its memory (or on its Blackboard);
Cooldown Node: returns TRUE only if that specific Node wasn't executed on the last "T seconds";
So Decorators shall be used to help allowing or blocking some branches. For example, the "Has Ammunition Node" can be used to let the "shooting" branch to be executed, or to block it and lead the tree to the "reloading weapon" branch.
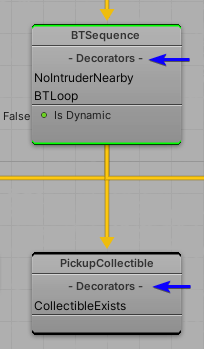
In order to define the Decorators, double click any Composite or Leaf node and you will be taken to its sub-grap. There, you will find a list of Decorators which will be executed in the order specified. Create new Decorators with the Right Mouse Button and link them with the Decorators root node, like the image below:

The Decorators defined on a node's subgraph can be seen on its top-level view on the Decorators list:
Service Nodes
Used mostly as Helper nodes which doesn't directly affect the flow of the Behaviour Tree. These nodes are usually used for changing the game state without the need of retuning anything.
Service Nodes are the only types of nodes which doesn't return a Status.
Just like Decorators, the Service Nodes can be added to Composite or Leaf nodes. Just go to the node's subgraph and create/link it to the Service Root node.
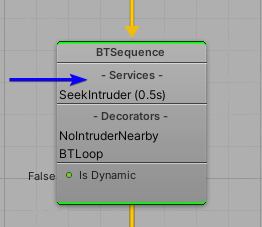
One important characteristic of the Service Nodes is that they are executed in intervals of time. Every Service node has a IntervalInSec field which you can define during edit time to define how frequent that Service shall be executed, which is helpful as you have more control regarding the performance.
PS: in order to use Service Nodes, please enable the BotSDKTimerSystem as this is how these nodes will count time;

Examples of Service Nodes are:
- Update Target Position Node: from time to time, updated the position that the Agent shall go to. It can be related to the NavMesh (like getting a random position on it), can be related to chasing a specific entity, etc;
- Perform Jump Node: from time to time, the Agent executes a jump;
So the Services are used as helpers because, as they don't need to return Status, they can be attached to whatever Node you need, even helping with decoupling things.
It is important to notice that Services are stored as part of the subtree being executed, which means that if you have a Selector node which has a Service, and you are currently "stuck" by running a specific Leaf, the Service that is contained by the Selector node will keep executing until that subtree is not the current anymore. So, lets say that your entire tree depends on having a Target position updated, then you can add a UpdateTargetPosition node to the first Selector/Sequence that you have. Or, if there is only one part of the tree that needs the Target position, then you can add the Service just there. So it is very flexible.
Just like the Decorators, you can observe the Services list on the top graph view:
In order to actually use the BT that you created, you have to compile your work.
To compile, you have two options:

- The left button is used to compile only the currently opened document;
- The right button is used to compile every AI document that you have on your project.
Your BT files will be located at: "Assets/Resources/DB/CircuitExport/BT_Assets".

Setting the AI to be used by your Bots
To finally use the AI created, you just need to reference the compiled assets.
You can do it by loading the asset based on the GUID, or you can just create an AssetRefBTRoot to point to the desired AI asset:

Behaviour Tree Coding
Adding the component to the Entity
To setup your own agent, add the component BTAgent to it, either directly on an Entity Prototype or adding it from code by creating the component via var btAgent = new BTAgent() and then setting it to the chosen entity with frame.Set(myEntity, btAgent).
Initializing the BTAgent
Then, at any point that better fits your application, you must call:
C#
var btRootAsset = f.FindAsset<BTRoot>(btReference.Id);
BTManager.Init(f, myEntity, btRoot);
The parameters are:
- The frame;
- The Entity which contains the BTAgent component;
- The BTRoot asset, created from the Visual Editor;
Now that the Entity's BTAgent is initialized, you just need to call the Update method on a Systems' Update:
C#
BTManager.Update(f, myEntity);
With this, the AI should already execute the flow that you created on the Visual Editor.
Nodes Coding
Overall, most of the node types inherit from the same class, so they all share very similar API which can be overridden for you to create your own custom code.
On this initial Behaviour Tree development stage, we encourage you to, for now, only implement Leaf, Decorator and Service Nodes, and take extra care if implementing a new Composite Node is needed, because this type of node requires a little bit more of knowledge on how the BT works. You can ask for new Composite nodes to be added too and, if it makes sense as a general use Node, not being something game specific, we might implement and deliver it as part of the default SDK.
Beginning your own Decorator/Leaf Nodes
- To create a new Decorator Node, create a new class which inherits from
BTDecorator; - To create a new Leaf Node, create a new class which inherits from
BTLeaf; - To create a new Service Node, create a new class which inherits from
BTService;
Important: you need to mark any of the classes above as [System.Serializable].
API for Decorator and Leaf Nodes
Initis called once, when theBTManager.Initis called. It shall be used to allocate space for that specific Node's data. For more info on this, please read the topic Node Data that follows;OnEnteris called at the moment that the specific node is visited, before the node's Update is executed. It is useful for setting up data, such as storing a timer FP. The classWaitLeafhas an example on how to store timer information on the Agent. But, again, that's better explained on the Node Data topic;OnUpdate, is called every tick while that is the Leaf being executed. ReturnsBTStatusso you can choose if/when you want to returnSuccess/Failure/Running. A very simple example, which always results inSuccesscan be seen in the classDebugLeaf. The classWaitLeafhas a slightly more complex sample, which results inRunningorSuccessOnExitis called when the node is done with its job, or if it was aborted and the execution is going upper on the tree. Can be used to de-initialize any data if needed;
Considerations regarding Decorator Nodes
Decorators have an extra method that can be overridden:
DryRunis called during the Node's Update. It returns aBooleanwhich depends on your game specific needs
When implementing Decorators, it is common to usually care more about the implementing the DryRun method, because Decorators usually return either Success or Failure, which depends directly if you DryRun returned True or False. So it is not the most common case to need to change this by implementing the OnUpdate method, but yes, it can be something needed.
API for Service Nodes
OnUpdatecalled whenever the Service is executed, which depends on the interval defined on the Visual Editor.
Node Data
Some nodes might need to have its own Integer and/or FP data, which shall be added to the game state and that can be only updated by the node itself.
As this is very common to some important nodes, the component BTAgent already has a storage for those node specific data.
For example:
- Composite Nodes needs to store the current Child Index that is being executed;
- The
WaitLeafnode needs to store what will be the time value in which the waiting will be over;
The same way, you might need to have some data into your node which needs to be changed during runtime.
But remember, Nodes are data assets, so you cannot change its fields during runtime. You need to have the data stored as frame data, and then change it from there.
For Integers and FP fields, that's easily achievable by using the type BTDataIndex. This structure is pre-baked during the compilation process on the Visual Editor and guarantees that every BTDataIndex that you have on your Node assets will have an unique index value.
If you identify that your node needs such volatile data, you can just follow this step-by-step:
- Create a new field of type
BTDataIndexwith a suggestive name so you know what data that index will be representing. For example, on theWaitLeafcode, the field declaration is:public BTDataIndex EndTimeIndex;, as that specific node needs to read/write the EndTime during runtime; - On the
Initmethod, you will allocate the data into the BTAgent by executing:btAgent->AddFPData()orbtAgent->AddIntData();. You'll inform on the parameters what is the initial value that you want to be stored; - To read that data from the BTAgent, execute:
p.BtAgent->GetFPData(frame, EndTimeIndex.Index), where EndTimeIndex is just the sample that we have form theWaitLeafnode; - To write data on the BTAgent, execute:
p.BtAgent->SetFPData(frame, endTimeValue, EndTimeIndex.Index);
Reactive Decorators Coding
As explained on a previous topic, if there is a Decorator which observes Blackboard entries, it is possible to register it as a Reactive Decorator so, whenever a change is applied to the observed entries, the Decorator will be re-checked, possibly aborting the current execution.
In terms of code, follow these steps to use the Reactive Decorators:
- On the
OnEntermethod of a Decorator class, register the Decorator on every Blackboard entry needed, depending on which entries you want to observe:
// --> Sample from BTBlackboardCompare

    // We let the user define, on the Visual Editor, which Blackboard entries
    // shall be observed by this Decorator
    public AIBlackboardValueKey BlackboardKeyA;
    public AIBlackboardValueKey BlackboardKeyB;

    public override void OnEnter(BTParams p)
    {
      base.OnEnter(p);

      // Whenever we enter this Decorator...
      // We register it as a Reactive Decorator so, whenever the entries are changed,
      // the DryRun is executed again, possibly aborting the current execution
      p.Blackboard->RegisterReactiveDecorator(p.Frame, BlackboardKeyA.Key, this);
      p.Blackboard->RegisterReactiveDecorator(p.Frame, BlackboardKeyB.Key, this);
    }
- On the
OnExit, unregister the Decorator:
// --> Sample from BTBlackboardCompare

    public override void OnExit(BTParams p)
    {
      base.OnExit(p);

      // Whenever the execution goes higher, it means that this Decorator isn't in the current subtree anymore
      // So we unregister this Decorator from the Reactive list. This means that if the Blackboard entries
      // get changed, this Decorator will not react anymore
      p.Blackboard->UnregisterReactiveDecorator(p.Frame, BlackboardKeyA.Key, this);
      p.Blackboard->UnregisterReactiveDecorator(p.Frame, BlackboardKeyB.Key, this);
    }
- Whenever you change your Blackboard entries which you want to trigger the Reactive Decorators reaction:
blackboard->Set(f, "SomeKey", someValue)->TriggerDecorators(p);
Defining fields values
Find here more information on the alternatives that you have when settings values to Actions/Decisions fields: Defining fields values.
AIParam
Find here more information on using the AIParam, which is useful if you want to have more flexible fields that can be defined in different ways: settings by hand or from Blackboard/Constant/Config Nodes: AIParam.
AIContext
Find here more information on how to pass agent-contextual information as parameter: AIContext.
BotSDKSystem
There is a class which is used to automate some processes such as deallocating Blackboard memory. Find here more information about it: BotSDKSystem.
The Debugger
Bot SDK comes with its own debugging tool. It enables the developer to select any BTAgent during runtime and see the most recent agent's flow highlighted on the Visual Editor. Here is a sample of the debugging tool working on the Bot SDK Sample project:
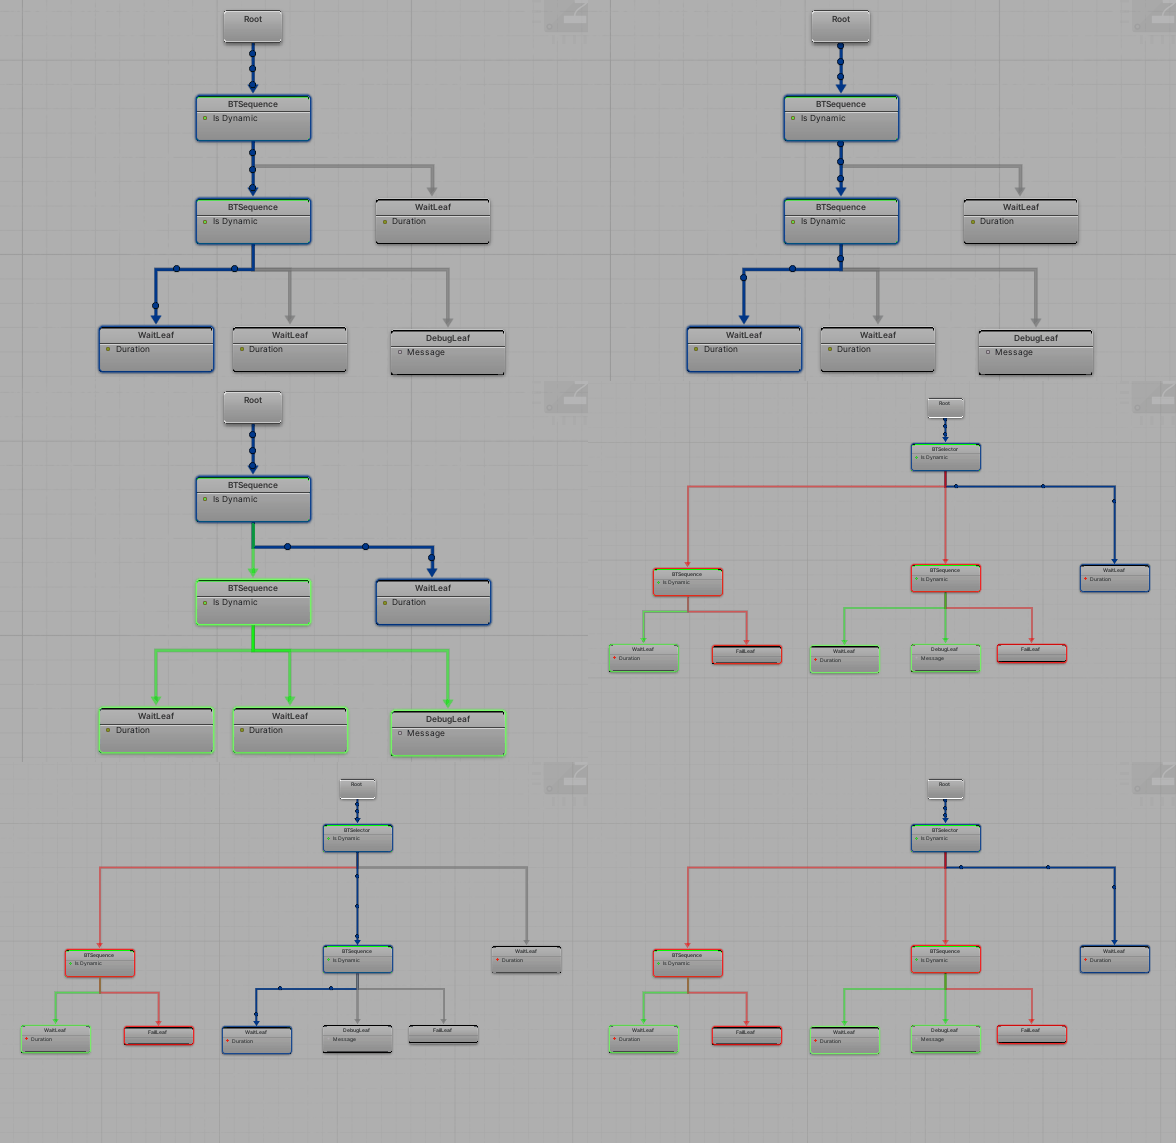
- Blue = current sub-tree being executed. The blue links shows the path taken to far and the most deep blue Node is the one that is currently running;
- Green = every successful sub-tree at that point of the application. Be aware that a Composite Node will only be painted as green if its children succeeded accordingly (Sequence needs all successful children, Selector needs at least one successful children);
- Red = every unsuccessful sub-tree at that point of the application;
- Gray = branches that were not visited, and that might be visited later.
Using the Debugger
This is the step-by-step in order to use the debugger on your project:
- Enable the
BotSDKDebuggerSystemon yourSystemSetup.csfile. Using this specific system is optional as, if it is your preference to have the debugging logic somewhere else, you can just callBotSDKDebuggerSystem.OnVerifiedFrame?.Invoke(f);within your own custom systems, at verified frames; - On the visual editor, click on the bug icon on the top panel. The debugging it active when the icon is colored as green;

Now, there are two ways of choosing which entity will be debugged. It can be related to a selected Game Object, or it can be selected on a inspector window. You can choose one of the above. Or both:
Debugging from a Game Object:
Select your prefab/entity prototype which represents a Quantum entity which has the
BTAgentas a component;Add the
BotSDKDebuggerto it;During runtime, with the Bot SDK window opened, select the game objects which has the
BotSDKDebuggeradded. There you go! The debugging shall already be working;
Debugging from a debugger inspector window:
On the simulation side, you need to register the Agent entity to the Debugger Window. It can be done by calling:
BotSDKDebuggerSystem.AddToDebugger(entitiRef, (optional) customLabel)The default name that is shown for the debugged entities follow this pattern:
Entity XX | AIAssetName. But if you want to give a custom name to the debug entry, you can use thecustomLabelparameter. It can be anything that you want.It is also possible to create hierarchies. Just use the separator
/on the custom label and it will create the hierarchies on the Debugger Window, which can be collapsed, expanded, etc;On Unity, click on the button which is on the right side of the debugger activation button. It opens a new window which shows all registered entities. Select the one that you want to debug and that's it.

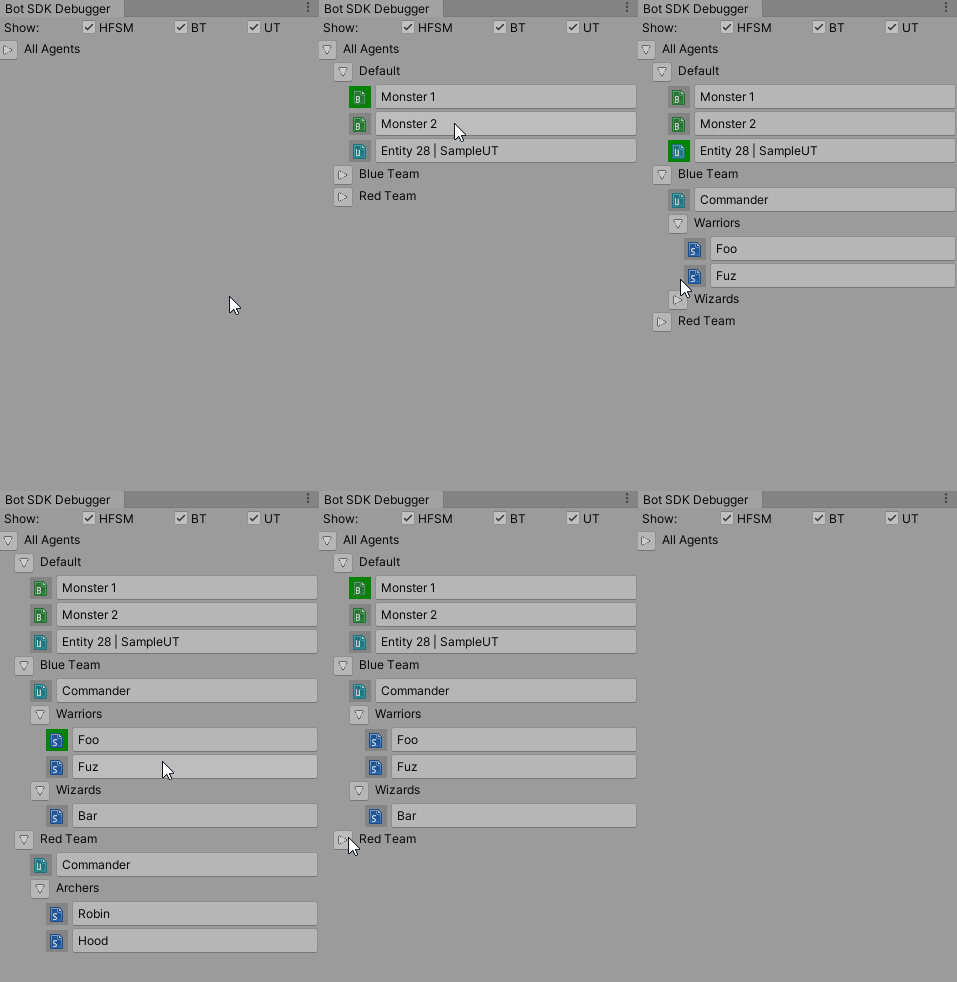
Just to exemplify, some custom labels used on the sample gif above were: Monster 1, Monster 2, Blue Team/Commander, Blue Team/Warriors/Foo, Blue Team/Warriors/Fuz and Blue Team/Wizards/Bar
**Important: ** when the Debugger is activated, it will allocate memory to store the data needed for the debugging, which might slow down the game if you are playing from the editor. So, if you are profiling the application from within Unity, parts of the profiling might be related to the debugger, so consider deactivating it during profiling.
PS: the debugger window will also show entities which doesn't have an entity view, so this is how you can find it to debug their BT;
PS2: currently, it isn't possible to debug agents which are not linked to an entity, such as agents which lies on the DSL global. This will be added only on further versions.
Visual Editor Comments
Find here more information on how to create comments on the Visual Editor: Visual Editor Comments.
Changing the compilation export folder
By default, assets generated by Bot SDK's compilation will be placed into the folder Assets/Resources/DB/CircuitExport. See here how you can change the export folder: Changing the export folder.
Choosing the saved History Size
It is possible to change the amount of history entries saved on Bot SDK files. Find here more information on this matter: Changing History Save Count.
Back to top- Introduction
- Creating a new Behaviour Tree
- The Root Node
- Nodes Status
- Creating new nodes
- Composite Nodes
- Interrupting with Decorators
- Leaf Nodes
- Decorator Nodes
- Service Nodes
- Setting the AI to be used by your Bots
- Behaviour Tree Coding
- Nodes Coding
- Beginning your own Decorator/Leaf Nodes
- API for Decorator and Leaf Nodes
- Considerations regarding Decorator Nodes
- API for Service Nodes
- Node Data
- Reactive Decorators Coding
- Defining fields values
- AIParam
- AIContext
- BotSDKSystem
- The Debugger
- Visual Editor Comments
- Changing the compilation export folder
- Choosing the saved History Size