Photon Command Line Manual
Most of the Photon server operations can be done using PhotonControl application.
However, if you prefer command-line tools Photon already has what you need.
"PhotonSocketServer.exe" contains the commands necessary related to Photon server.
It can be found in any of the "deploy\bin_*" folders inside the Photon server SDK.
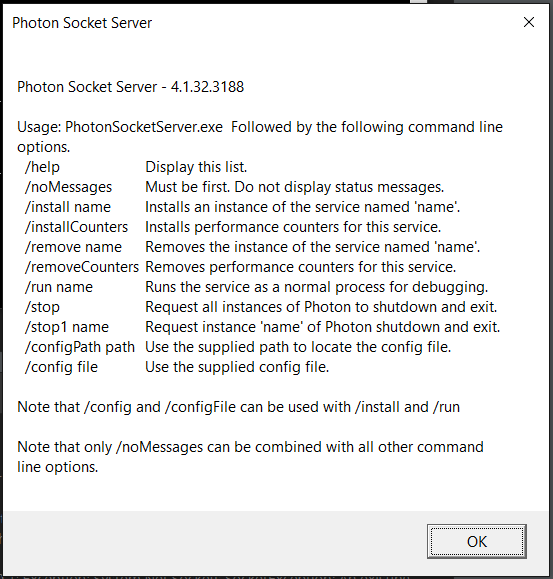
You can list all the commands and arguments possible using the /help argument.

All the commands support a silent mode using /noMessage argument.
This mode disables the creation of pop up dialogs in case of error.
It is useful for automation purposes.
Manual
Photon as a Windows Service
To install Photon server as a Windows service:
PhotonSocketServer.exe /install <PhotonServiceName>
Then you can use the Windows sc command to start and stop the Photon service.
To uninstall the Photon Windows service you can use:
PhotonSocketServer.exe /remove <PhotonServiceName>
Photon as a Process
To start a Photon instance for debugging, the most simple command is:
PhotonSocketServer.exe /run <PhotonServerInstanceName>
Depending on the configuration, one Photon server instance may contain more than one Photon server application.
But each Photon server instance requires a PhotonSocketServer process.
To stop all running Photon server instances at once:
PhotonSocketServer.exe /stop
To stop a specific Photon server instance:
PhotonSocketServer.exe /stop1 <PhotonServerInstanceName>
Using Configuration Files
By default, Photon uses configuration file "PhotonServer.config" in the working directory (same folder as "PhotonSocketServer.exe").
If you want to use a custom filename, for instance when you have multiple configurations, you can use:
PhotonSocketServer.exe /<run|install> <PhotonServerInstanceName|PhotonServiceName> /config <ConfigFileName>
If you want to explicitly specify a configuration file by path, you can use:
PhotonSocketServer.exe /<run|install> <PhotonServerInstanceName|PhotonServiceName> /configPath <ConfigFilePath>
Photon server will not start if the configuration file could not be found.
Photon Performance Counters
To install Windows performance counters for Photon:
PhotonSocketServer.exe /installCounters
If you want to remove them you can use:
PhotonSocketServer.exe /removeCounters
Workflow Example
In this complete workflow example we will demonstrate how to install Photon server on a production machine.
The Windows service configuration, as well as the use of logman are just suggestions.
Download, unblock and then unpack the content of the Photon server SDK to "C:\Photon"
From a PowerShell window, go to the binary folder of your choice:
cd C:\Photon\deploy\bin_*(OPTIONAL) To setup counters and counter logging (using logman):
.\PhotonSocketServer.exe /noMessages /installCounters
logman.exe create counter photon_perf_log -si 00:05 -v mmddhhmm -cnf 24:00:00 -cf "..\bin_tools\perfmon\logman.config.txt"
logman.exe start photon_perf_log
Install Photon as service:
.\PhotonSocketServer.exe /noMessages /install LoadBalancing(OPTIONAL) Configure the service:
sc.exe failure "Photon Socket Server: LoadBalancing" reset=86400 actions=restart/5000
sc.exe config "Photon Socket Server: LoadBalancing" start=auto
sc.exe config 'Photon Socket Server: LoadBalancing' depend=iphlpsvc/TermService start=delayed-auto
Starting and Stopping the Service
From cmd:
sc start "Photon Socket Server: LoadBalancing"
sc stop "Photon Socket Server: LoadBalancing"
From PowerShell:
Start-Service 'Photon Socket Server: LoadBalancing'
Stop-Service 'Photon Socket Server: LoadBalancing'
Clean Up
To remove the counters and the service:
logman.exe stop photon_perf_log
logman.exe delete photon_perf_log
.\PhotonSocketServer.exe /noMessages /removeCounters
.\PhotonSocketServer.exe /noMessages /remove LoadBalancing