Hierarchical Finite State Machine (HFSM)
Introduction
With State Machines one can easily define the possible states in which an agent can be.
Every State is essentially composed by:
- Actions: represents what kind of logic is performed by the agent when it enters/updates/exits a state;
- Transitions: links from one State to others which defines what are the possible other states that the agent can change to.
Bot SDK's state machine is hierarchical (HFSM), meaning that every State also can have a set of sub-states (or children states), which makes a huge difference in terms of how the State Machine can be organized. It is a very important piece on more complex AI behaviours, but using hierarchy levels is not mandatory.
State machines puts in the hands of developers the definition of every possibility for the AI agent, as all the States, Actions and Transitions are defined by them. State machine algorithms usually don't try to create plans or come up with solutions out of the scope that was set by the developer.
For now, lets call it an AI model with fixed structure, as everything is fixed and nothing is planned/created in runtime.
Pros and Cons
Here is a list of pros and cons to consider when using Bot SDK HFSM:
- Pros:
- Performance: due to its fixed structure nature and simplicity on its internal mechanism, the HFSM is very fast. Then most of the performance depends on how the user implements their specific AI logic, such as the Actions and Decisions;
- Memory Consumption: the
HFSMAgentcomponent is quite simple and only needs to cache a small set of data in order to work. Due to this, having lots of HFSM agents does not increase too much the memory usage; - Ease of expression: the concept of States, Actions and Transitions are quite simple to understand. That's one reason why state machines are often mentioned in the game development area. Both coders and game designers can understand its concepts pretty fast and start developing right away;
- Tight control: its fixed structure allow users to know with more precision what is happening in one State and what can happen in terms of transitions.
- Cons:
- Tight control: yes, this is both positive and negative. Needing to define every possibility creates a specific type maintenance necessity, as adding more states and logic might require the developer to re-visit the current states again and maybe adjust them frequently;
- Spaghetti states: complex HFSMs can become quite difficult to understand due to the amount of states and transitions. Using well the Hierarchy and adding Comments can be very important into making the AI graph easier to understand and maintain;
- Lower flexibility: some times it might be an interesting approach to let the AI itself try and make plans instead of hand-defining everything, which is something more possible with Bot SDK's Utility Theory;
When using Bot SDK, the HFSM is, in general, an interesting approach, specially if it fits the team's personal preferences on AI design. It can be used for simple or complex agents and, compared to the other Bot SDK models, it is the one that better scales for a large amount of agents due to its CPU and memory efficiency.
Creating a State Machine document
In the Bot SDK window, click on the New Document button and choose Hierarchical Finite State Machine (HFSM):

Choose a name for the AI document. This document is a Scriptable Object which has the XML that is needed on the editor side only, which is not revelant to the Quantum simulation. It does not need to be shipped in builds.
The name chosen for this AI document will also be the name of the Quantum asset created, that is used on the simulation to actually update entities AI, so it is nice to already pick a suggestive name.

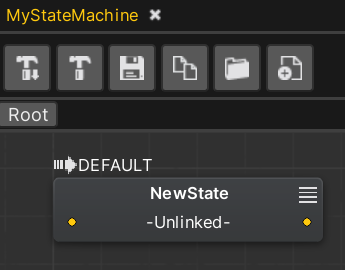
Creating a new HFSM document already populates it with a very basic State which doesn perform any action, nor has any transition:
The characteristics of a State:
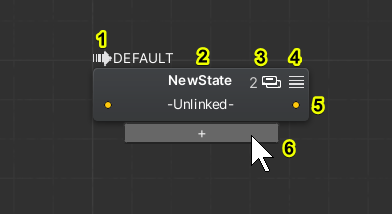
- Indicates that this is the initial state for this hierarchy level;
- The State's name;
- Shows the amount of children states it has, if any (this is zero by default);
- Collapse/Expand button;
- The transitions this has;
- A button for adding one more transition (it only shows up when hovering the mouse on it);
Creating a new State
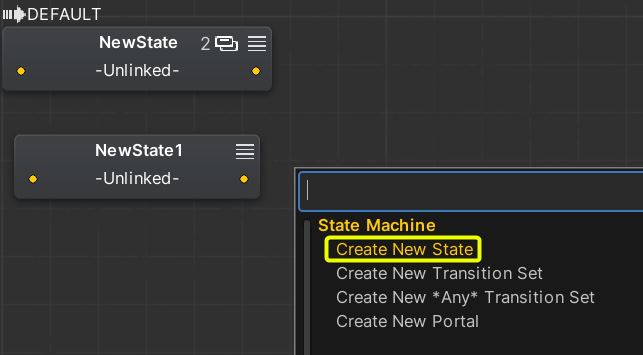
To create a new State, right click on any empty space on the Editor window and select Create New State
Editing a State
To edit a State, right click the target state and select Edit This State or select it and press F2.
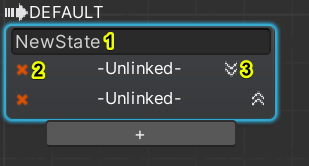
- Define the State name;
- Delete the transition;
- Reorder the transition (only visually, does not defines transitions priorities).
Press Enter to apply the changes or press Esc to discard the changes.
Collapsing the State view
It is common to see HFSMs increasing a lot in terms of the amount of States and Transitions, which can make it difficult to actually understand the flow of some HFSMs.
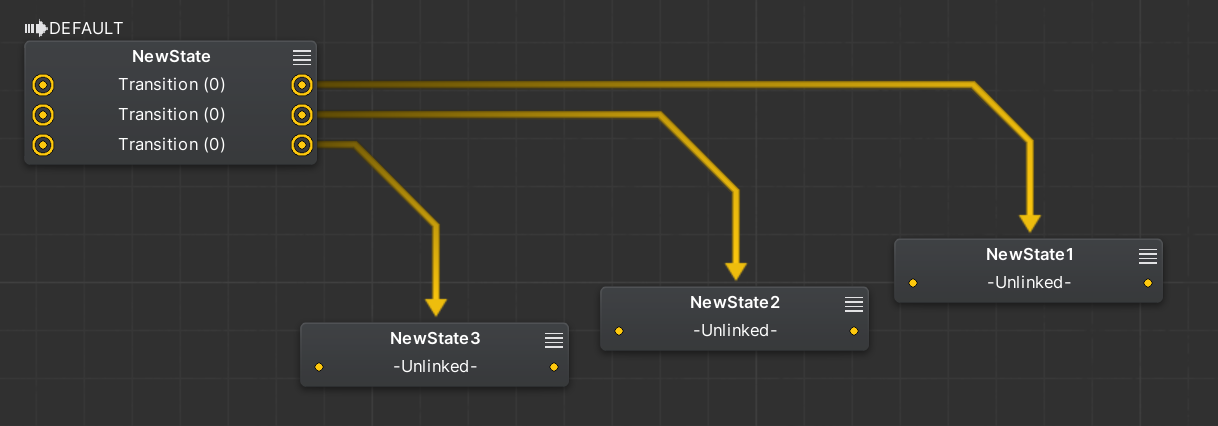
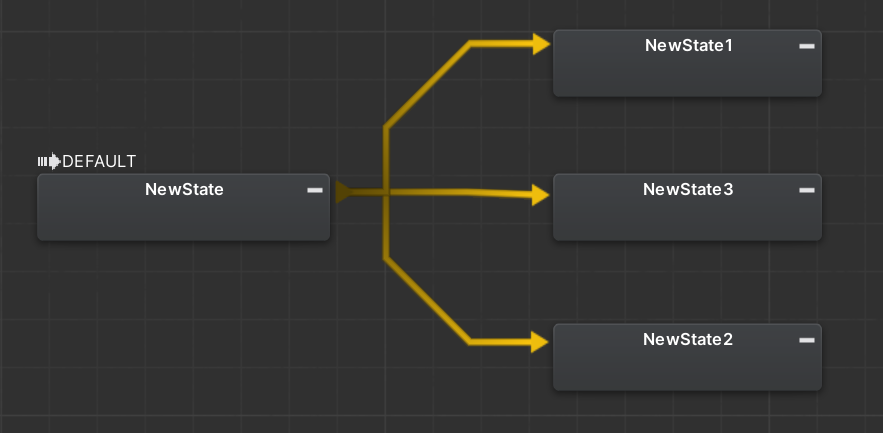
In any State node, click on the Collapse button to hide the transitions slots and change the way that the lines are drawn from/to it, thus enabling a simplified view.
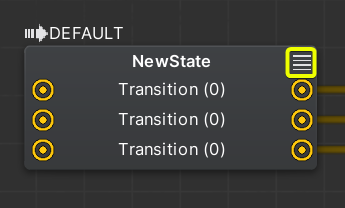
Let's analyse the before and after.
Before:
After:
Creating a Transition between two States
To start creating a Transition between two states, first click any of the small circles on the left/right borders of a State.
Then, click on another state and a new transition will be created.
It is also possible to click on an empty space instead and the editor will display the nodes creation panel from which a new State can be created right away.
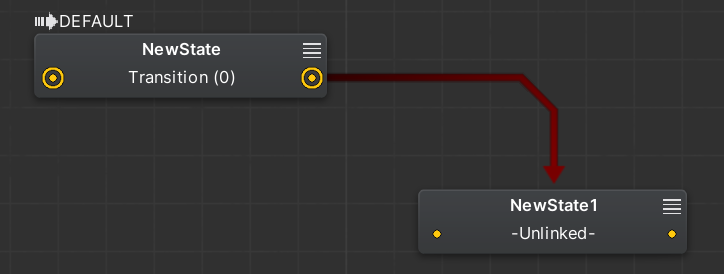
Whenever a new transition is created, it will have a dark color, indicating that the transition's condition is not yet defined.
There are some ways of interacting with a transition:
- When the mouse cursor is over a transition, it will become bold;
- When selecting a transition with the left mouse button, small dots will walk through it to indicate the transition's direction and destination. Press Delete to remove the transition at this stage;
- Double click a transition to go to it's sub-graph;
- There are also other alternatives from the right click menu, such as the Mute alternative which can be very handy;
Every Transition sub-graph has a fixed node. Let's take a analyze it:
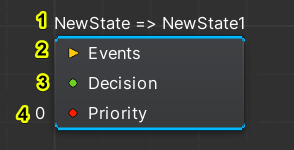
This is the node that defines a Transition.
It has four important aspects:
- The node name, which indicates origin State and the target State. The name can be changed from the right click menu, making it possible to set a meaningful name which appears on the upper level, making it easier to understand what are the Transition's conditions;
- Define an Event to be taken in consideration when evaluating this Transition;
- Define the Decision, or set of Decisions, that composes the transition;
- Define an order of execution between all transitions that comes from that same node (more details further).
Let's define a simple Decision for this transition.
To do that, right click in any blank space and a panel will show all the possible nodes that can be created. Look for the .
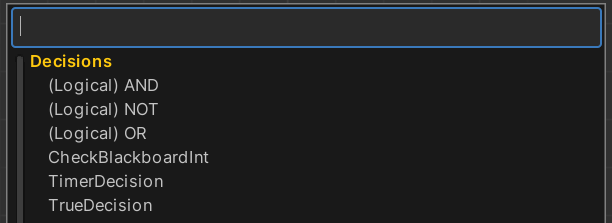
For simplicity sake, let's select the TrueDecision, which always returns True (meaning that the transition shall happen).
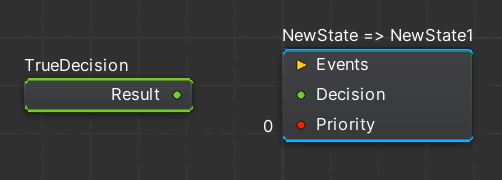
There is an output slot which defines where the result of this Decision will be driven to.
Left click the slot and connect it to the Decision slot:
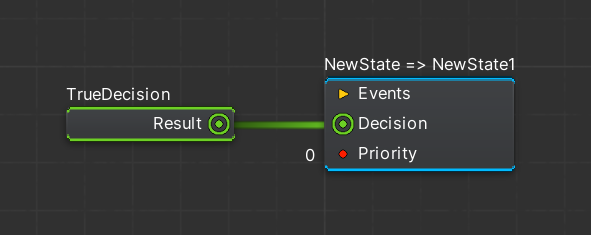
With this setup, whenever the Bot is in NewState and the HFSM is updated, the state machine will make a transition to NewState1.
It is possible to edit the value of most slots by clicking on it's value field.

Press Enter to apply the changes or press Esc to discard the changes.
To navigate back to the upper level, either use the breadcrumb buttons on the top bar or press Ecs.
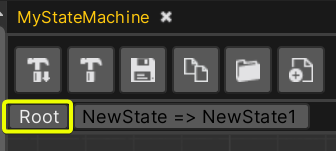
Alternatively, it is possible to navigate through the States by using the left side panel, in the States section:
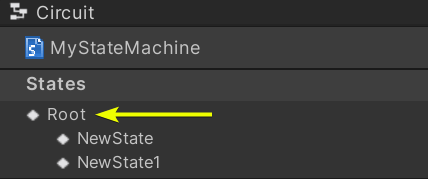
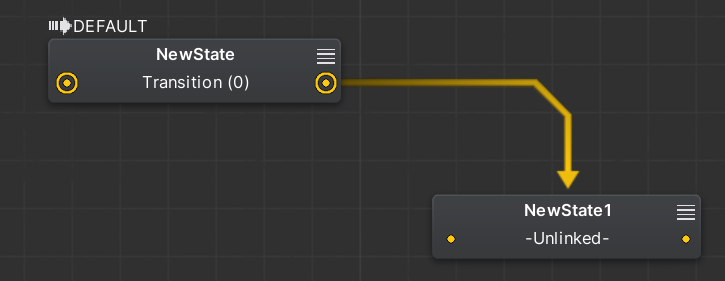
As the Transition is now defined, it has a brighter color, so whether the Transition is taken depends on the conditions coded in the chosen Decision.
When no Decision nor Event is provided, the Transition is always taken.
Defining the transitions Priorities
On states that has more than one transition, it is possible to define which ones will be evaluated first.
To define such order, use the Priority slot on the Transition node.
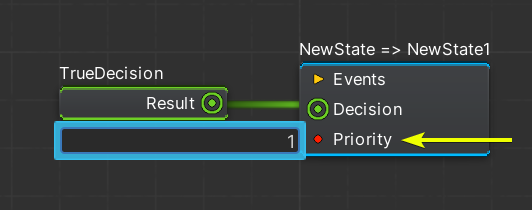
It is possible to see the Transition's priority on the State node:
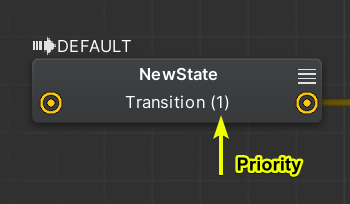
The order in which the Transitions are evaluated is Descending Order (from the highest to the lowest priority values).
Creating new Transitions
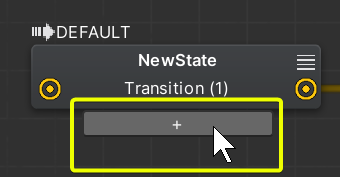
In order to create a new Transition, hover the cursor on the bottom part of a State and a (+) button will appear. Click on it.
Special Transition Types
Transition Sets
These types of node can be used to group up multiple transitions, which can be handy for reusability and organization.
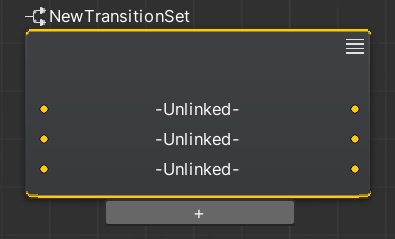
To create a new Transition Set, right click in the empty space and select Create New Transition Set. Notice that this kind of node can also be renamed.
This will create a node very similar to the State node: it begins with a single undefined Transition, with the possibility of adding multiple transitions from the bottom corner button:
Then, create the links between the Transition Set and other states.
Here is an example:
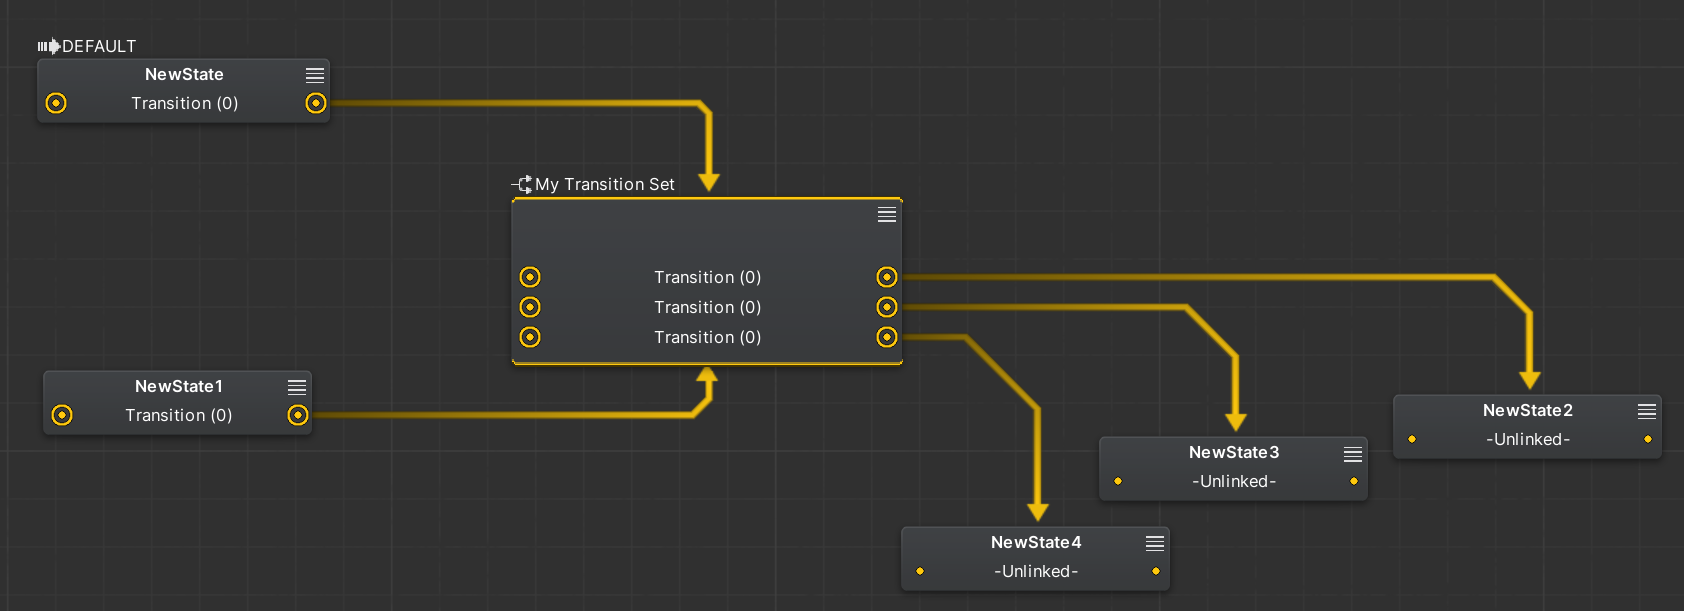
It is also possible to collpase Transition Sets using its top-right corner button:

ANY Transition
This type of Transition can be used to quickly create transitions to a target State, from all other States, without having to add such transition on all of them.
It only considers the States on the same hierarchy level (hierarchies will be explained further in this document).
Create new ANY Transitions from the right click menu.
Now, define the target state(s).
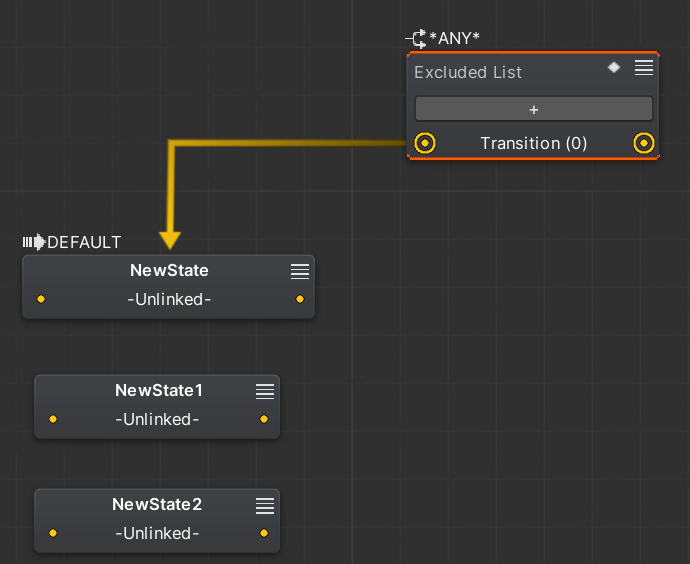
In the example above, every State on that specific level of the hierarchy will consider ANY node's transition.
It is possible though to define a list of States which should ignore the ANY Transition, or a list of the only ones which should consider it.
These are called the Excluded List or Included List. Use the diamond shaped button to switch the list type, and pick States from the + button:
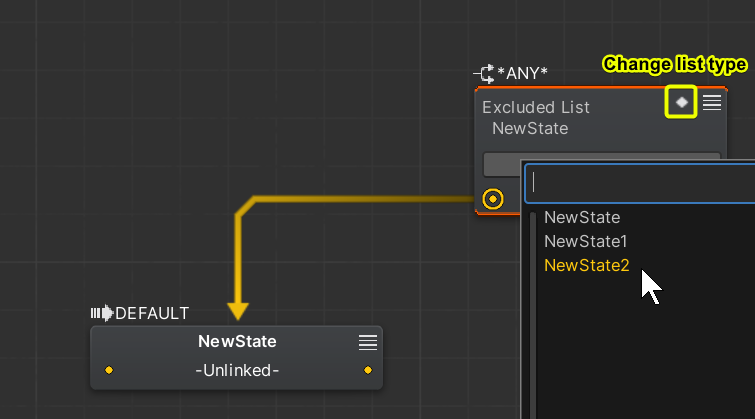
PS: the target node is also included by the ANY Transition, so it can make a State transition to itself.
Portal Transitions
This type of transition is meant to force the HFSM to go from a State to any other state, even if it is not on the same level of hierarchy.
Create new Portal Transitions from the right click menu and use the dropdown menu in order to define the target state:
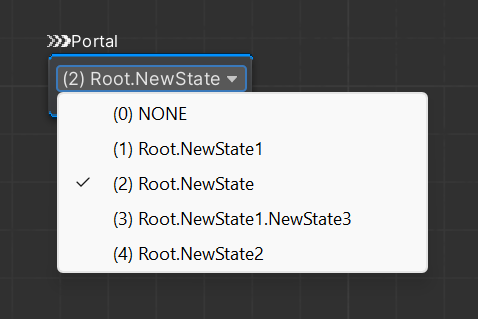
Now, define which States should consider taking the Portal:
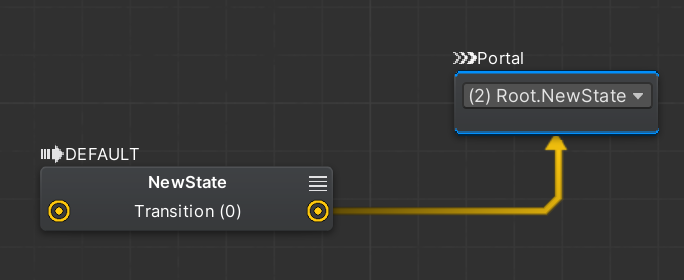
PS: it is also possible to right click on any of the states in the left panel hierarchy in ordero to create a new Portal to such state on the current graph view.
Composed Decisions
Besides of using a single Decision to define a Transition, it is also possible to create compound decisions.
Bot SDK comes with 3 logical Decision nodes ready to use.
Here is an example showcasing composed decisions based on the AND, OR and NOT:

Events
It is possible to set up transitions in a way that they can be triggered in an event-like manner, defined by a name, and not necessarily via a Decision.
This can be very helpful as it allows for triggering transitions from outside of the HFSM pipeline, as an event can be triggered from any logic on the simulation, such as from a System logic.
Events work in a very simple way: whenever an event is triggered, the current state's transitions will check if that event is being listened to.
If any of the current transitions listens to that event (from the current state and the states upper in its hierarchy), the event check is successful.
Here is how an HFSM Event is triggered (from simulation code):
C#
HFSMManager.TriggerEvent(frame, entityRef, "FooEvent");
This can not only be added to Bot SDK related classes, but also to custom user systems and logic.
In order to create a new event, click on the (+) button on the left side panel, in the Events session:

Type the Event name. It is also possible to double click on an Event to edit the event name or delete it.
In order to place an event on the Transition's sub-graph, drag and drop it.
Then link the Event's outbound slot to the Transition's Event slot:
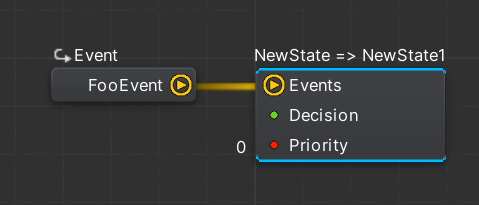
Note: Differently from the decisions, there are no composite Events and a transition does not accept more than one event connected.
Transitions defined by only an Event are considered valid transitions.
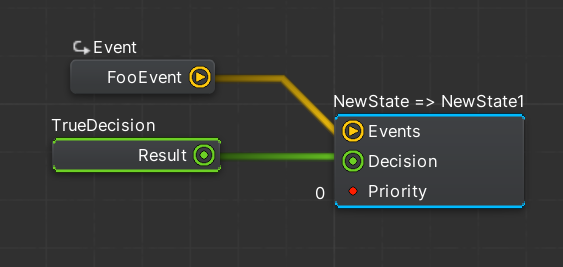
It is also possible to define a transition by setting both an Event and a Decision.
In this case, that Transition only happens if both the Event is triggered and the Decision conditions pass, on the same frame.
Defining Actions
Other than defining the flow of a State Machine (with States and Transitions), it is very important to implement AI Actions which will make the State Machine actually do something, like changing the game state.
Find more information here: Defining Actions
Hierarchy
On any State's sub-graph, it is possible to create new sets of States and Transitions. This then creates a parent-children relationship between the states.
All the current State's hierarchy is executed when the HFSM is updated. From the parent, child, grandchild states, and so on.
This way, it is possible to encapsulate sub-state machines inside of another state machines.
This can be extremely useful when organizing an HFSM as it can get very complicated to organize a complex behaviour in a single level of hierarchy.
An example: have two different root States: one to handle "Patrolling and Searching" logic and another one for "Chasing and Attacking" logic.
Each of those main states can have many sub-states created to handle those specific kinds of situation separately.
To create a child State, enter in any State's sub-graph, and create a new State there.
The states hierarchy can be observed on the left side menu:
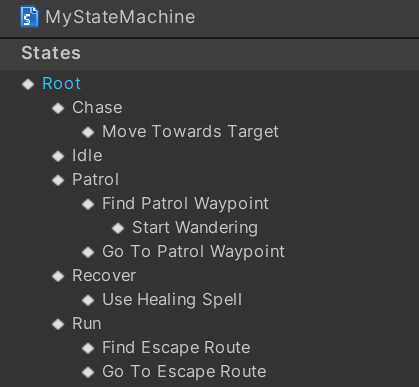
Note: it is possible to navigate on the hierarchy by clicking on those buttons.
Important: it is also possible to define, for every level of the hierarchy on the HFSM, which are the Default States. This is what defines what are the children states entered when transiting between parent states. To define which is the Default State, right-click any State Node and select "Make Default State".
Compiling a State Machine document
In order to actually use the HFSM in the simulation, it is necessary to compile everything done on the AI document, every time a meaningful change is done.
To compile, there are two options:

- The left button is used to compile only the currently opened document;
- The right button is used to compile every AI document on the project.
By default, the HFSM files will be located at: Assets/QuantumUser/Resources/DB/CircuitExport/HFSM_Assets.
The type of the main asset created by this process is HFSMRoot.

Using the HFSMRoot asset
To use the created HFSM root asset, make a reference to it using a field of type AssetRef<HFSMRoot> and load it via frame.FindAsset().
HFSM Coding
The HFSM has a main component named HFSMAgent, which can be used basically in two different ways:
- Add the component into entities, either via code or directly in an Entity Prototype on Unity;
- Or, declare instances of the
HFSMAgentin the frame's Globals;
The most common usage is to add the component into entities. But having it decoupled from entities can also be useful to create things such as a Game Manager HFSM which lies in frame.Global and has the logic for the start of a game match, update of game rules, match end, etc.
Initializing an HFSMAgent
When not added directly into an Entity Prototype, the HFSMAgent component can be added to entities directly via code. It can be useful for, in runtime, turning an entity into an AI agent, such as when a player disconnects, etc.
Here is a code snippet for adding the component (only if not already added to the Entity Prototype):
C#
var hfsmAgent = new HFSMAgent();
f.Set(myEntity, hfsmAgent);
The HFSMManager class has lots of utility methods which are the main entry points for initializing and updating an HFSM agent.
Call HFSMManager.Init() in order to initialize an agent, making it store its initial State (as defined in the editor) and already calling OnEnter on that state and all of it's Default children hierarchy.
The initialization step below needs to be done *whether EntityPrototypes are used or not:
C#
var hfsmRootAsset = f.FindAsset<HFSMRoot>(hfsmRoot.Id);
HFSMManager.Init(frame, entityRef, hfsmRootAsset);
Initializing using the "OnComponentAdded" callback
It is also possible to setup the reference to the HFSMRoot asset directly on the EntityPrototype, and use the OnComponentAdded signal to initialize the agent with that information.
It is what the BotSDKSystem showcases. Here is an example:
C#
// At any system...
  public unsafe class AISystem : SystemMainThread, ISignalOnComponentAdded<HFSMAgent>
  {
    public void OnAdded(Frame frame, EntityRef entity, HFSMAgent* component)
    {
      // Get the HFSMRoot from the component set on the Entity Prototype
      HFSMRoot hfsmRoot = frame.FindAsset<HFSMRoot>(component->Data.Root.Id);

      // Initialize
      HFSMManager.Init(frame, entityRef, hfsmRoot);
    }
  // ...
  }
Updating the HFSMAgent
After initializing the agent, update it:
C#
HFSMManager.Update(frame, frame.DeltaTime, entityRef);
This starts the entire HFSM mechanism: the current state will be updated, it's Actions will be performed, transitions well be checked and so on.
Sample system which initializes and updates the Agents
C#
namespace Quantum
{
  public unsafe class AISystem : SystemMainThread, SystemMainThreadFilter<AISystem.Filter>
  {
    public struct Filter
    {
      public EntityRef Entity;
      public HFSMAgent* HFSMAgent;
    }

    public void OnAdded(Frame f, EntityRef entity, HFSMAgent* component)
    {
      HFSMRoot hfsmRoot = f.FindAsset<HFSMRoot>(component->Data.Root.Id);
      HFSMManager.Init(f, entity, hfsmRoot);
    }

    public override void Update(Frame frame, ref Filter filter)
    {
    HFSMManager.Update(frame, frame.DeltaTime, filter.Entity);
    }
  }
}
Coding Actions and Decisions
To create new AI Actions, follow these instructions: Coding Actions
Creating new HFSM Decisions is done in a very similar way.
Create a class which inherits from HFSMDecision and override the Decide method, returning true or false depending on which condition should make the decision pass or not.
Important: always mark the AIAction and HFSMDecision classes with the [System.Serializable] attribute.
Here is an example of the most basic HFSM decision provided in the SDK:
C#
namespace Quantum
{
  [System.Serializable]
  public partial class TrueDecision : HFSMDecision
  {
    public override unsafe bool Decide(Frame frame, EntityRef entity)
    {
      return true;
    }
  }
}
Defining fields values
Find here more information on the alternatives for settings values to nodes fields: Defining fields values.
AIParam
Find here more information on using the AIParam type, which is useful for having flexible fields that can be defined in different ways: setting it by hand or from Blackboard/Constant/Config Nodes: AIParam.
AIContext
Find here more information on how to pass agent-contextual information as parameter: AIContext.
BotSDKSystem
There is a class which is used to automate some processes such as initializing and freeing Bot SDK components memory upon component Added and Removed callbacks. Find here more information about it: BotSDKSystem.
The Debugger
Bot SDK comes with its own debugging tool. It makes it possible for the developer to select any HFSMAgent in runtime and see the most recent agent's flow highlighted on the Visual Editor. Here is an example of the debugging tool in the Bot SDK Sample project:
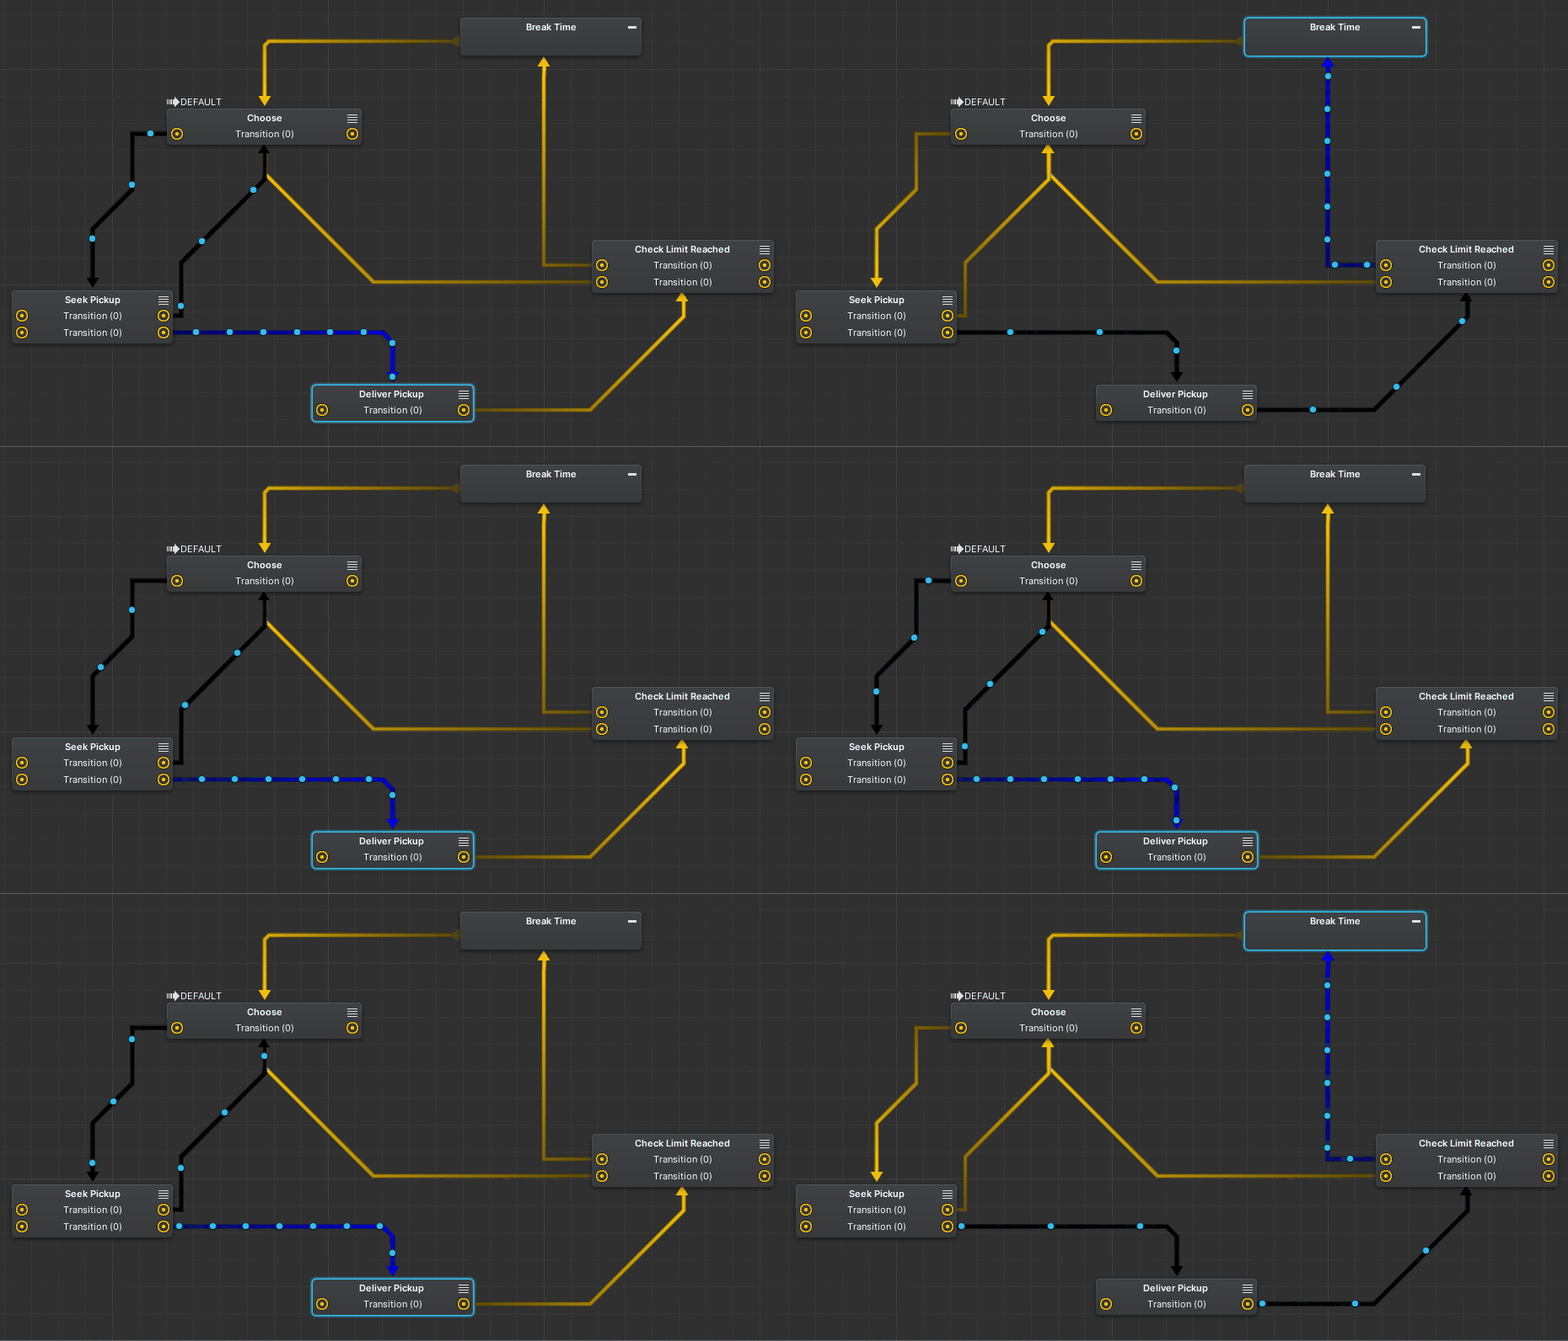
As shown in the gif above, it is possible to see what is the current state in which the agent is, and which were the most recent three transitions taken which led to that state. The blue transition is the most recent one. It also has more circles going through the line than the previous transitions, that are colored black.
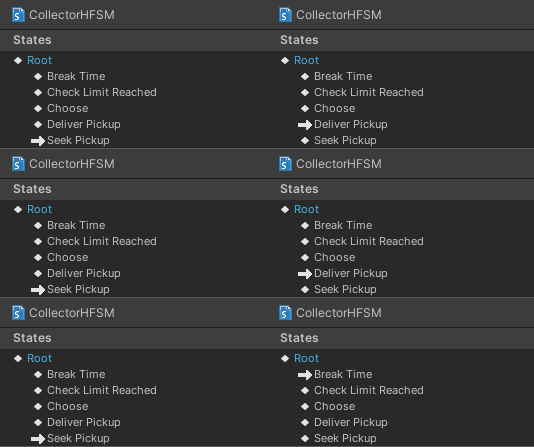
In addition, it is also possible to inspect the current states on the hierarchy view. The states with an arrow represents that the HFSM is currently on that state. It is useful to quickly check the current state with no need to find it in the nodes.
Using the Debugger
This is the step-by-step necessary in order to use the debugger:
- Enable the
BotSDKDebuggerSystemin the Systems Config file. Using this specific system is optional as the same API it uses can be called from user custom logic: callBotSDKDebuggerSystemCallbacks.OnVerifiedFrame?.Invoke(frame);in verified frames; - In the visual editor, click on the little bug icon on the top panel. The debugger is active when the icon is colored as green;

There are two ways of choosing which entity will be debugged:
Debugging using a Game Object:
- Select the prefab/entity prototype which represents a Quantum entity which has the
HFSMAgentcomponent; - Add the
BotSDKDebuggerUnity component to it; - In runtime, with the Bot SDK window opened and the debugger enabled, select the game objects which has the
BotSDKDebugger. The debugging shall already be working;
Debugging using the Debugger Window:
On the simulation side, register the Agent entity to the Debugger Window. It can be done by calling:
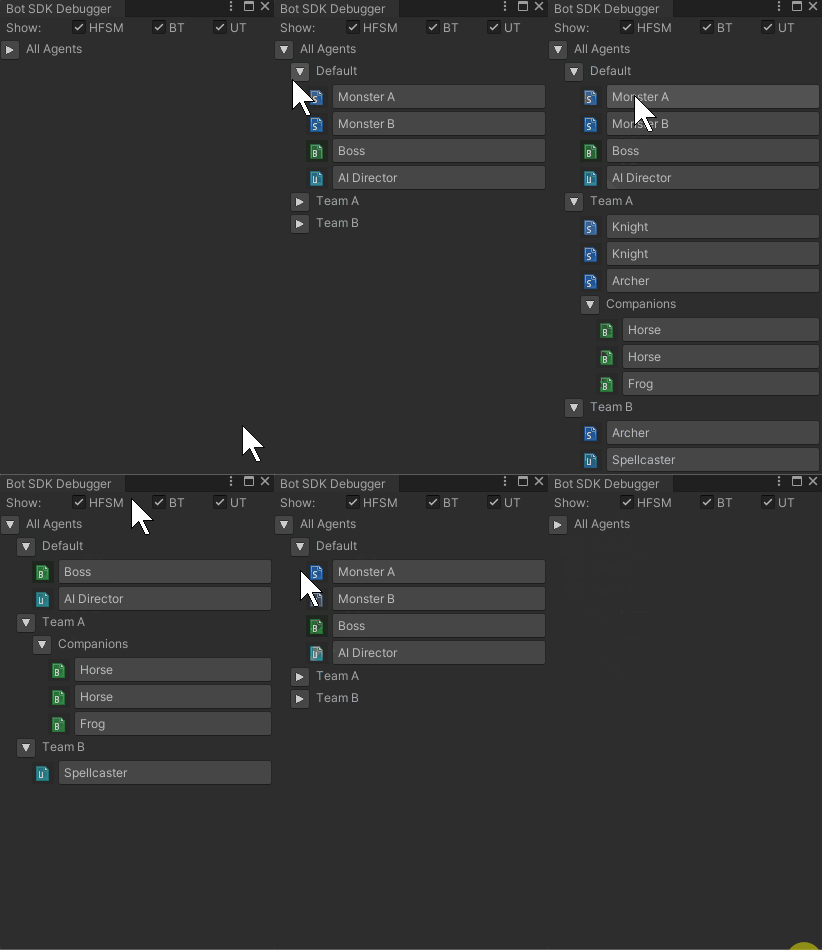
BotSDKDebuggerSystem.AddToDebugger(frame, collectorEntity, hfsmAgent, (optional) customLabel);The default name that is shown for the debugged entities follow this pattern:
Entity XX | AI Document Name. But it is possible to assign specific labels using thecustomLabelparameter.It is also possible to create naming hierarchies. Use the separator
/on the custom label and it will create the hierarchies on the Debugger Window, which can be collapsed and expanded;On Unity, click on the button next to the debugger activation one. It opens a new window which shows all registered agents. Select the one to be debugged.

Important: when the Debugger is enabled, it increases the memory and CPU usage in order to process the agents data.
This may degrade the game performance so make sure to always disable the debugger during performance tests and use it when debugging agents behaviour. Even if the debugger is not being actively used, it still processes data on the background.
PS: currently, it isn't possible to debug agents which are not linked to an entity, such as agents which lies on the DSL global.
Muting
When testing the AI, it might be useful to mute nodes in order to temporarily disable some logic. Find here more information on how to Mute nodes: Muting
Visual Editor Comments
Find here more information on how to create comments on the Visual Editor: Visual Editor Comments.
Changing the compilation export folder
By default, assets generated by Bot SDK's compilation process will be placed into the folder Assets/Resources/DB/CircuitExport. Check here how to change the export folder: Changing the export folder.
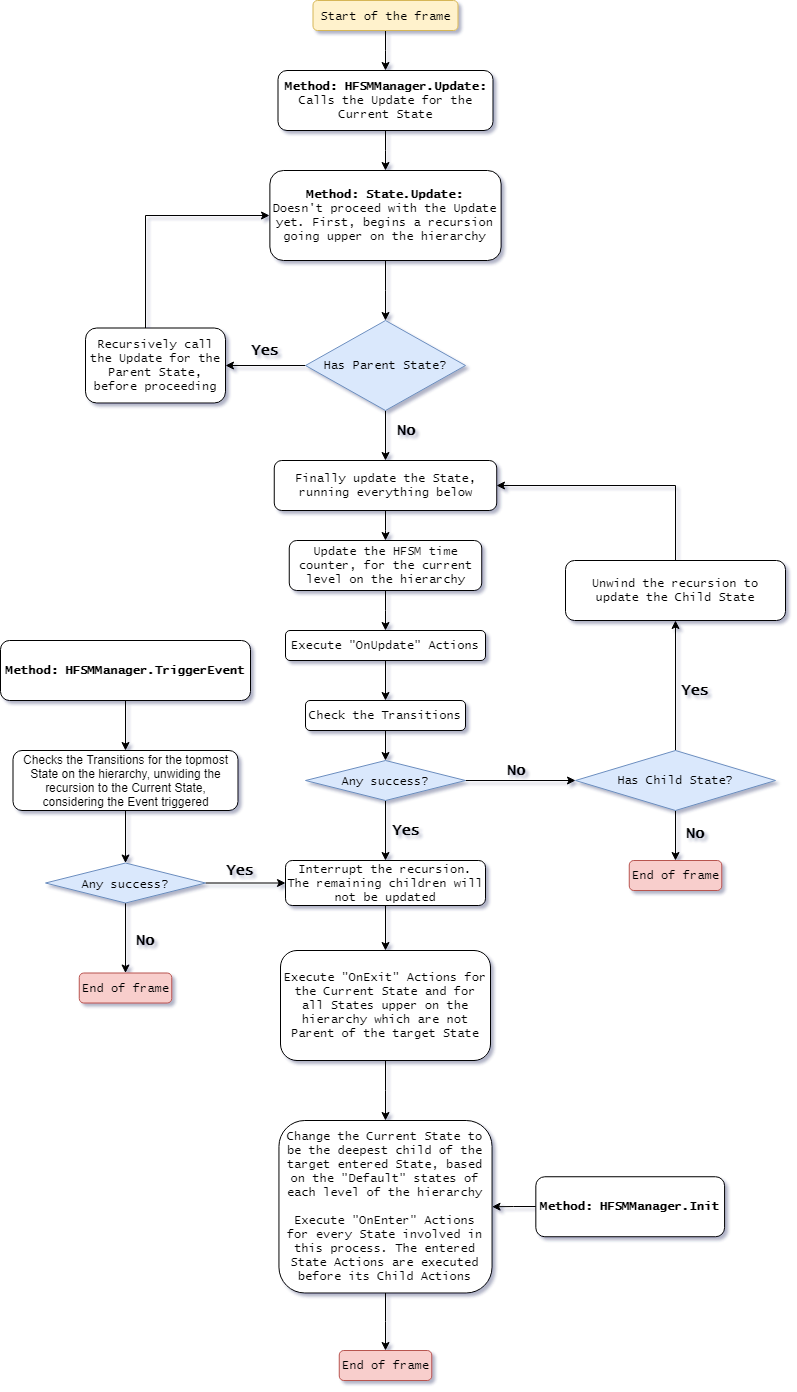
What Happens in a Frame
On Bot SDK, the main entry points are:
HFSMManager.Init, which is used to initialize the agent and already make it run initial actions of the Default State;HFSMManager.Update, which should be called constantly to update the agents;HFSMManager.TriggerEvent, which forces transition checks specific to an event key.
In order to better visualize what happens during a frame when these methods are executed, here is a flow graph:
- Introduction
- Pros and Cons
- Creating a State Machine document
- Creating a new State
- Editing a State
- Creating a Transition between two States
- Defining the transitions Priorities
- Creating new Transitions
- Special Transition Types
- Composed Decisions
- Events
- Defining Actions
- Hierarchy
- Compiling a State Machine document
- Using the HFSMRoot asset
- HFSM Coding
- Initializing an HFSMAgent
- Initializing using the "OnComponentAdded" callback
- Updating the HFSMAgent
- Sample system which initializes and updates the Agents
- Coding Actions and Decisions
- Defining fields values
- AIParam
- AIContext
- BotSDKSystem
- The Debugger
- Muting
- Visual Editor Comments
- Changing the compilation export folder
- What Happens in a Frame